
Deploying a Ghost Blog on AWS with Cloudfront

Want to host your own blog on AWS? Don't want to use Wordpress? The Ghost platform is easy to use and comes with a lot right out of the box. This post will walk you through how to spin up a Ghost blog using:
- An AWS EC2 instance
- A Ghost Bitnami AMI
- CloudFront (for caching)
- Route 53
This post assumes that you already have an AWS account
Launching the Ghost AMI
Find the image on the AWS marketplace, I used the Bitnami image, follow the onscreen instructions to first subscribe to the image and then launch the EC2 right from the same screens. Or you can go to the AMI tab within EC2 and launch from there.
When launching your instance keep in mind:
- Ghost needs a minimum of 1GB of memory to run so pick at least a
t2.micro. - In the security group, make sure to allow incoming HTTP and set up a rule for SSH with your IP so you can SSH into it. Some security group best practices.
- Associate an Elastic IP address to your instance (this will allow you to keep the same public IP if your instance goes down or you need to stop and restart, etc.)
Visit your site
After your EC2 is up and running, let's go visit your newly launched site. Find your public IP on the dashboard and hit <public-IP>/admin or <public-IP>/ghost. Fingers crossed... and BAM! you should see your login page. The default username is user@example.com. There are two ways to find your password:
- You can find it in the logs within the first 24 hours - while on your AWS EC2 dashboard select the instance and select
Actions -> Instance Settings -> Get System Logsor - You can SSH into your box and look at the logs using
cat ./bitnami_credentials
**TO SSH into your EC2 you select your instance from the AWS EC2 console and select Connect. It will give you instructions on how to get into your box.
CloudFront
Now that you have your site running on the public-ip address it is time to add CloudFront to the mix. Navigate to the CloudFront dashboard and create a distribution. Below are the key pieces you need to get your EC2 instance to work with CloudFront:
- In the
Origin Domain Namefield put the full public IP of your instance which is in the format:ec2-.....amazonaws.com. - Forward your
Hostheader to the Origin in order to make sure your vanity url doesn't redirect to your public IP
- Put your URL in the
Alternate Domain Namessection - To set up your SSL Cert click the
Request or Import a Certification with ACM- you will have to come back to this CloudFront page once the certification has been verified by AWS to add your cert - Leave the other options as default and create the distribution. When back on the dashboard make note of the
Domain Nameas you will need it for Route 53. Also note that it can take up to 15-30 minutes to create the distribution.
**Great step by step to CloudFront distributions
Route 53
In order to use Route 53, you will need to have your domain managed by AWS. If you don't you may need to transfer your domain management to AWS or use your current provider (although the directions here only apply if your domain is a hosted zone with AWS).
Now let's add a custom URL
- Navigate to your Route 53 dashboard and click
Hosted Zones - Create a new record set
- Set your URL, I usually chose
blog.<whateveryoursiteis>.com - Set the
TypetoA - IPV4 address - Select
Aliasto YES - Then in
Alias Targetadd the CloudFront domain name that was the result of the creation of the distribution from above and click save. - Keep the other options as default and save record set
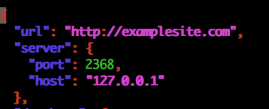
Once this is done, SSH into your instance and add the URL used above to your Ghost configuration file at /opt/bitnami/apps/ghost/htdocs/config.production.json
**More info on the Ghost config
SSL Certificate for HTTPS
It is important to add a certificate for security reasons. If you have followed the directions from above, your certificate will be processing or at this point verified and ready for use. To view your certificates you can go to your Certificate Manager dashboard.
Once your certificate is done processing:
- Go back to your CloudFront distribution and add your certificate from the dropdown list below the radio button

- Click save - again it may take a little bit for the distribution to update
Set up email
If you want to add additional Authors or Admins to your Ghost account you will need to set up SMTP forwarding. To do that SSH into your instance and go back into the config file /opt/bitnami/apps/ghost/htdocs/config.production.json
You will need to add the following:
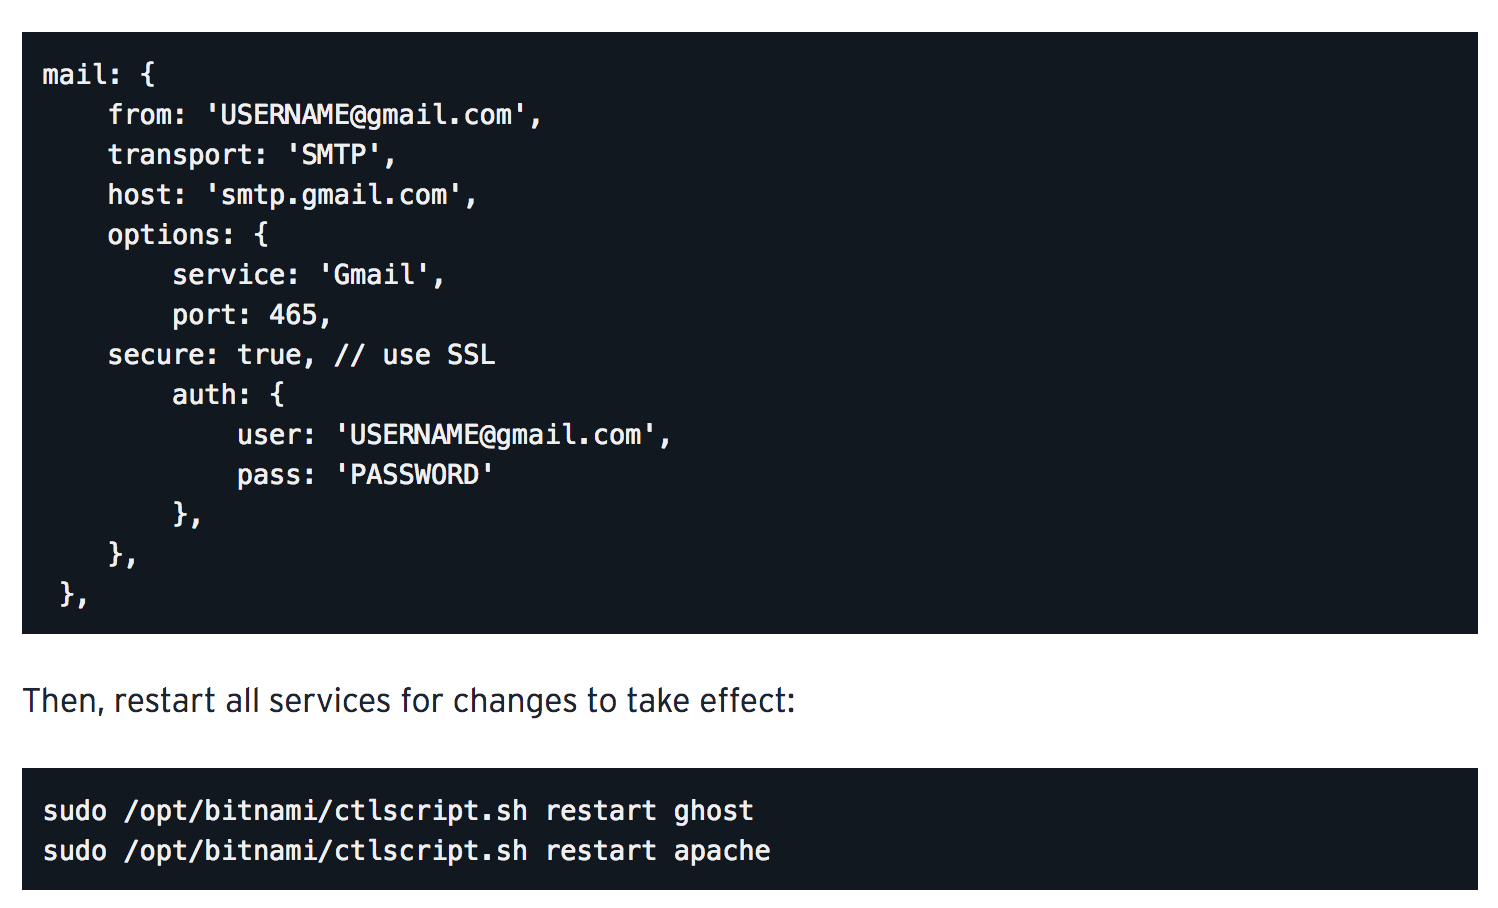
Lastly, if you are sending from a gmail account you will also want to enable Less Secure App(You will need admin access to your account in order enable this). Further reading here.
**More on setting up/configuring Ghost email
You should be all set. Happy Trails!!