
Home Automation with Home Assistant and Alexa
Do you have an Alexa and all you do is ask her to set a timer? It's time to put her skills to good use. Yep, that's right let's set up your house so you can say things like "Alexa, turn on the bedroom lights". This blog post will walk you through how to bring Alexa to life and take command of your home. There are plenty of gadgets and gizmos you can buy to set up your home with ease, but what would be the fun in that.
This post outlines all the necessary things you need to get Alexa to turn on your lights. Throughout this tutorial, I also include links to helpful articles because without these I would have been stuck.
This post will cover the following:
- The hardware needed to get started(at least what I am currently using)
- Setting up Home Assistant on your Pi
- Configuring Pi to receive radio signals
- Wiring up your Pi with the transmitter and receiver
- Finding radio signals on your Pi
- Adding devices (in this tutorial lights)
- Setting up Alexa
Before we begin, I'd like to point that there are two major open source platforms that I have found that you can use to get your system up and running. OpenHab and Home Assistant. After reading many blogs comparing the two I have decided to go with Home Assistant, partially because it is written in python which I find quite interesting.
"Alexa lets get started"
Physical Items You need to get started
The links listed below are from Amazon but you can get them from whatever vendor you prefer
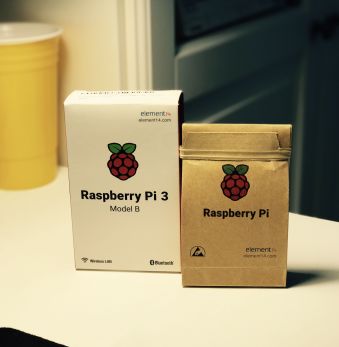
- Rasberry PI. I am using a Rasberry PI 3 B+. This version has an HDMI (normal) input as well as 4 USB inputs, which makes it really easy to hook up a keyboard, mouse and a monitor or run headless(discussed below) ~ $36
- Jumper wires to connect your transmitter/receiver to your Pi ~ $10
- A micro USB card (used to load Hassbian discussed below ~ $14
- Etek City outlets that transmit/receive 433/hz signals ~ $30
- A SD card to usb adaptor where you can 'flash' hasbian ~ $10
- 433MHz RF Wireless Transmitter and Receiver Module ~ $10 (you can get the cheaper ones but I found that this set transmits much further)
- An SD card reader to flash your disk image to run the PI ~ $10
- Amazon Echo ~ $50
- Optional: A case for your PI.
Total Cost: ~$170
Now for Hassbian setup
Once all of your parts arrive follow the steps below:
- Using the SD USB card, flash the sd card with Hassbian (download it here) using Etcher (for mac or windows)
- If you want to run in headless mode in the future (without a monitor or keyboard) you will also need to add a file to the boot drive titled
sshwithout any extension before ejecting from your computer. Reference article. - Follow the instructions that came with your Pi to boot it up with your new SD card inserted into it
- Make sure you plug a network cable directly into the PI from your router which will give it access to the internet.
- Once it boots up, give the device at least 5-10 minutes to download Home Assistant.
- To check to make sure Hassbian has been downloaded, you can check three different ways.
- You can visit
http://hassbian.local:8123/in your computer browser - You can find your IP address and then type it in your browser followed by
:8123(ie:10.0.0.1:8123) and it should pull up the same page as before and should look something like the image below. - Lastly, you can
sshinto your pi within the Terminal or shell client, usingssh pi@<your-ip>. While in your terminal and in ssh, see if this file path exists:/home/homeassistant/.homeassistant. If it does you are all set. Remember this last option because usingsshis how you will manage and configure your devices later on.
- You can visit

Done!... for now
Install software on Pi to receive radio signal
I followed this tutorial to install the appropriate libraries: Wiriing Pi.
Below are the steps as well.
- While using
sshon your PI, install wiringPI, cd into the directory and run the build command:
git clone git://git.drogon.net/wiringPi && cd wiringPi &&./build
-
Once installed if you run
gpio readallshould show the gpio pin allocation on your PI. -
Next, install a library that allows us to send out data via the transmitter and receive it through the receive module. This library is 433Utils
$ cd back to your root
$ git clone --recursive
$ git://github.com/ninjablocks/433Utils.git
$ cd 433Utils/RPi_utils
$ make all
You now have the software needed to listen for signals. On to wiring your Pi!
Wire up the transmitter and receiver to your Pi
I will walk you through a brief set up on how to wire your Pi. For additional information, feel free to read Jeremy Cook's article.
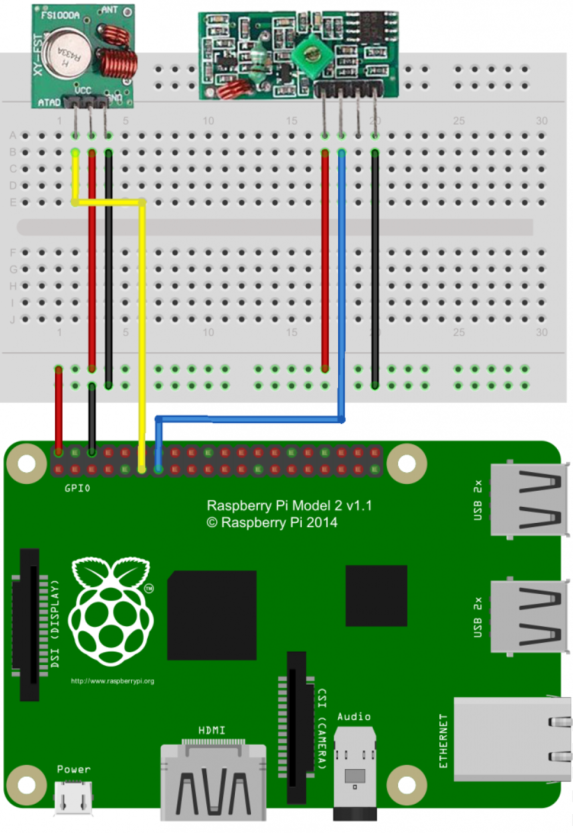
- Before wiring up any of the transmitters, make sure your Raspberry Pi is powered off. You can use the command
sudo shutdown -h nowto power it down. Wait until the LED stops blinking and then unplug from power. - You can use the image below as a guide to wire up your pi and/or reference the article I mentioned above.
One step closer now!
Prepare Pi to find your 433/hz receivers
Now that your Pi is all wired up let's start looking for signals
- Power up your Pi and
sshinto it (or use your monitor set up) - Take your EteckCity outlets or comparable devices and plug them into a wall and figure out which number on the remote turns off which lights.
- Let's test your Transmitter:
$ cd 433Utils/RPi_utils/
$ sudo ./RFSniffer
Then press the on or off button on the Etekcityremote and if it works you will see something like Received 12345.
4. Next, let's test your Reciever:
//open a new tab in terminal or ssh client
$ cd 433Utils/RPi_utils/
$ sudo ./codesend 1234  #whatever number you'd like
If it is working you will see something like sending code[12345].
5. Last but certainly not least you will need to install rpi_rf which allows Home Assistant to talk to your receivers. Follow instructions here
6. To sniff out your codes and after the rpi_rf is installed first double check to make sure python 3 is installed:
$ sudo apt-get update
$ sudo apt-get upgrade
$ sudo apt-get install phython3-pip
```
7. Then create a python script `touch rfrx.py` which will record your receivers.
8. Open this file by typing `sudo nano rfrx.py` and copy and paste the `rpi-rf` receive code found [here](https://github.com/milaq/rpi-rf/blob/master/scripts/rpi-rf_receive) and save it.
9. Then run `sudo python3 rfrx.py`, this will trigger your Pi to start listening for signals.
10. Press the button on your remote and it will register the codes in the terminal (like below).
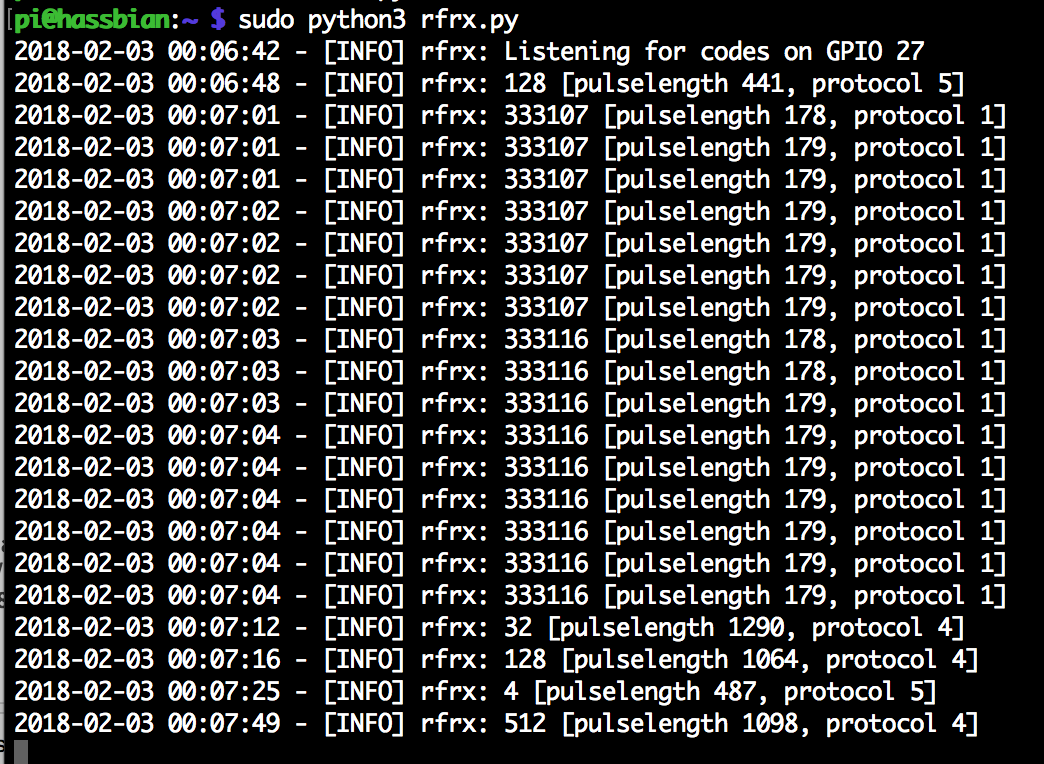
You are now ready to add lights configuration!
---
####Now the best part, adding your devices
This is where the fun begins
__Lights__:
In this post we will only set up lights. To set up lights I am using the `rf_rpi switch` api. [Doc Reference](https://home-assistant.io/components/switch.rpi_rf/).
1. To add devices cd into the following path in your Pi `/home/homeassistant/.homeassistant`.
2. Then open your config file using `nano configuration.yaml`. The docs referenced above highlight what each attribute does, so no need to discuss that here.
3. Below is an example of how I configured the switch API to set two lights in the living room and two lights in the bedroom:
```
#settup rf lights
switch:
platform: rpi_rf
gpio: 17
switches:
bedroom_lights:
pulselength: 181
protocol: 1
code_on: 341251, 335107
code_off: 341260, 335116
signal_repetitions: 50
living_room_lights:
pulselength: 178
protocol: 1
code_on: 333107, 333251
code_off: 333116, 333260
signal_repetitions: 50
```
**You will use the codes you "sniffed" in the previous section and them to your config here.
Once you have configured it how you want, you can restart HA by calling `sudo systemctl restart home-assistant@homeassistant.service`. You can also use the UI interface to restart HA.
----
#### Lastly, and the best part, let's set up Alexa
1. Start by adding the [cloud component](https://home-assistant.io/components/cloud.alexa/) from home assistant to your Pi. Follow the directions in the link above This feature just came out late 2017 and is free to use until March 1, 2018. After that is will cost $5 going to a good cause to keep the Home Assistant community growing.
2. Make sure you are running Home Assistant 6.0, you can check the version in the UI `http://hassbian.local:8123/dev-info`
3. Cd into your configruation.yaml again and add the `cloud` piece. See below for my sample setup. The link listed above goes into more explanation on each attribute. Again, no need to repeat it here.
4. Once configured make sure you restart Home Assistant using the command listed above. Then as mentioned in the Home Assistant docs have you add the `Home Assistant` skill in the Alexa app.
5. Once this is added and still in the Alexa app, navigate to the `Smart Home` tab, then click `Devices` and then click the button `Discover`. This should pull up the lights you configured previously. That's it!
Sample config code

Alexa Device Dashboard

_"Alexa, turn on the living room lights"_
WHOLA!! You made it and now have lights controlled by Alexa.
---
###### Helpful Home Assistant command line commands
1. SSH into your PI: `ssh pi@<your-ip>`.
2. 'To start, stop or check the status of home assistant: `sudo systemctl status home-assistant@homeassistant.service` and replace `status`, with `start` or `stop` or `restart`.
3. To check if your config file is properly set up:
```
$ sudo su -s /bin/bash homeassistant
$ source /srv/homeassistant/bin/activate
$ hass --script check_config
$ exit
```
[Common Tasks Docs](https://home-assistant.io/docs/installation/hassbian/common-tasks/)
---
####Shout Outs
* Music listened to while blogging: ["Apollo" by Magic Man](https://www.youtube.com/watch?v=D8MOcntooYc)
* [Raspberry Pi SSH](https://www.raspberrypi.org/documentation/remote-access/ssh/unix.md)
* Tutorials/Docs:
* [Hassbian Install Docs](https://home-assistant.io/docs/hassbian/installation/)
* [Cloud Docs](https://home-assistant.io/components/cloud.alexa/)
* [Setting up the Eteckcity Outlets with Home Assistant](https://www.youtube.com/watch?v=5UUazFbK-Hg)
* [Stack overflow discussing keys for jessie backports](https://raspberrypi.stackexchange.com/questions/12258/where-is-the-archive-key-for-backports-debian-org)